Adjustment screws.
Every sextant is equipped with error adjustment screws. The design of these screws varies from sextant to sextant. Some have ordinary screw driver slots while others have round heads with a hole drilled through it. The first requires the use of a suitable screw driver whilst the others require the use of a special pin inserted into the hole. In order to make an adjustment the screws should be adjusted gently clockwise or anti-clockwise to avoid cracking the mirrors. One must remember that the sextant is a precision instrument and any adjustments must be made delicately.
Types of error
There are approximately 10 errors a sextant may have, but only three of them are adjustable by the user. Two need to be adjusted by the instrument manufacturer and the rest are non-adjustable. In this module we will only discuss the first three:
- Perpendicularity error.
- Side error.
- Index error.
The errors need to be corrected in the order stated above.
Perpendicularity.
The index mirror must be perpendicular to the plane of the instrument. If not, then perpendicularity error is present.
Checking for perpendicularity
- Remove the telescope/monocle.
- Turn all shades away from the mirrors.
- Unclamp the index arm and move it to the middle of the engraved arc.
- Clamp the index arm.
- Hold the instrument in the horizontal plane and look into the index mirror in such a way that the true arc is visible to the left of the mirror and the reflected arc can be seen in the mirror.
- If the true and reflected arcs appear in a straight line, then there is no perpendicularity error present.
- If the true and reflected arcs are not in line, then error is present and needs to be removed.
- To remove perpendicularity error the first adjustment must be made.

Perpendicularity error (index mirror not perpendicular to the frame).
First adjustment.
With the telescope/monocle removed, the shades turned away from the mirrors and the index arm set to the middle of the arc, carry out the following:
- Take the adjustment pin from the sextant case.
- Insert the pin in the hole in the index mirror adjustment screw.
- Using gentle pressure, turn the adjustment screw until the true and reflected arcs
appear in a straight line. - Remove the pin carefully to avoid upsetting the adjustment and replace it in the sextant
case. - Perpendicularity error has now been removed.
Side error.
The horizon mirror must be perpendicular to the plane of the instrument. If it is not, then side error is present.
Checking for side error.
There re two methods of checking for side error:
- By horizon observation.
- By star observation.
The horizon method is the quickest but it requires a clear horizon. The star method is more accurate but requires more practice. When using the star method a 2nd magnitude star should be used because it provides a sharp point of light. A 1st magnitude star provides too much light and cannot be clearly seen. The horizon method is obviously used during the day and the star method for morning (pre-dawn) sights.
Horizon method.
- Remove the telescope/monocle and swing all shades away from the mirrors.
- Set the index arm and the micrometer drum to zero.
- Hold the sextant horizontally and look through the horizon mirror at the horizon.
- If the true and reflected horizons appear in a straight line, then there is no side error
present. - If the true and reflected horizons are not in a straight line then side error is present and
needs to be removed.

Side error present (horizon method).
Second adjustment (horizon method).
With the telescope/monocle removed and the shades turned away from the mirrors carry out the following:
- Remembering that there are two adjustment screws on the horizon mirror, identify the
2nd adjustment screw. This is on the side of the horizon mirror. - Remove the adjustment pin from the sextant case and insert it in the hole drilled
through the 2nd adjustment screw. - Hold the sextant in the horizontal position and look through the horizon mirror at the
horizon. - Gently turn the adjustment screw until the true and reflected horizons appear in a
straight line. - Remove the pin carefully to avoid upsetting the adjustment and return it to the sextant
case. - Side error has now been removed.
Star method.
- Fit the star telescope/monocle and swing all shades away from the mirrors.
- Set the index arm and the micrometer drum to zero.
- Select a suitable 2nd magnitude star.
- Hold the sextant in the vertical position and look directly at the star through the
telescope. - Turn the micrometer drum so that the true and the reflected image of the star pass over
one another. - If the true and reflected images coincide exactly as they pass one another, then there is
no side error. - If the true and reflected images pass to the side of one another then side error is present.
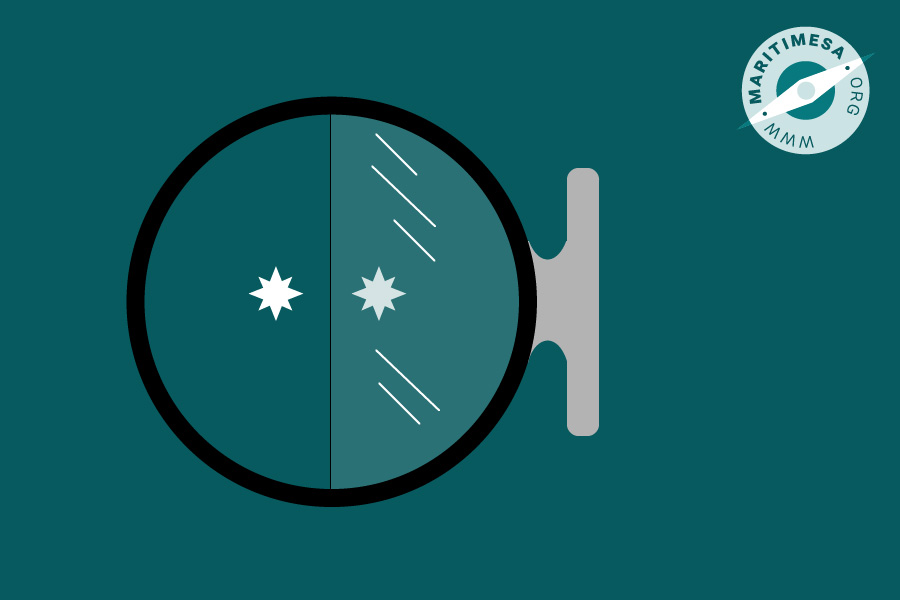
Side error present (star method).
Second adjustment (star method).
With the telescope/monocle in position and the index arm set to zero carry out the following:
- Identify the 2nd adjustment screw (this will be at the top or bottom of the horizon mirror).
- Remove the adjustment pin from the sextant case and insert it in the hole drilled in the adjustment screw.
- Look directly at the star.
- Gently adjust the horizon mirror so that the true and reflected image of the star coincides as the micrometer drum is turned.
- Remove the adjustment pin carefully and return it to the sextant case.
Index error.
When the index arm is at zero, the index mirror and the horizon mirror will be parallel. If they are not parallel then index error is present. There are two methods of checking for index error:
- Observation of the horizon.
- Observation of a star.
Checking for index error (horizon method).
The procedure is very similar to that used to check side error, except that the sextant is held in the vertical position.
- Fit the telescope/monocle to the sextant.
- Set the index arm and the micrometer drum to zero.
- Hold the sextant in the vertical position and look at the horizon.
- If the images of the horizon appear in a straight line, then there is no index error.
- If the images are not in a straight line then there is index error present.

Index error (horizon method).
Checking for index error (star method).
Again the procedure is very similar to that used to check side error:
- Fit the telescope/monocle to the sextant.
- Set the index arm and the micrometer drum to zero.
- Choose a suitable 2nd magnitude star.
- Hold the sextant in the vertical position and look at the star.
- If the images of the star coincide, then there is no index error.
- If the images are separate (ie, one above the other) then there is index error present.
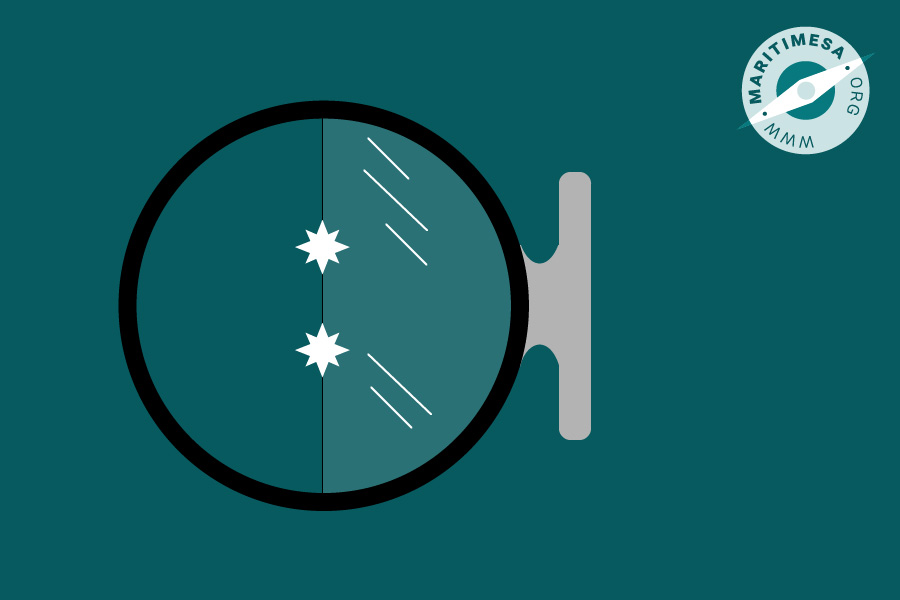
Index error (star method).
Third adjustment.
With the telescope/monocle fitted and the shades moved away from the mirrors, carry out the following:
- Set both the index arm and the micrometer drum exactly to zero.
- Locate the third adjustment screw on the horizon mirror (usually at the top of the
mirror). - Remove the adjustment pin from the sextant case and carefully insert it in the third adjustment screw.
- Hold the sextant in the vertical position.
- Look directly at the horizon or star.
- Adjust the horizon mirror until the true and reflected images are in a straight line.
- Carefully remove the adjustment pin and replace in the sextant case.
- The sextant should now be free of index error.
Interaction between the two adjustment screws on the horizon mirror.
Since the horizon mirror has two adjustment screws, there is an interaction between them. For example, when adjusting for side error it is possible to introduce index error and vice versa. It is necessary therefore to repeat the procedure for side and index error until no further errors can be detected.
Residual index error.
In order to reduce the possibility of the adjustment screws becoming loose with usage, it is recommended that a thorough check and adjustment of the sextant be carried out periodically but not too often. Usually only the residual index error needs checking and any error found applied as a small correction to the navigator’s observed altitudes and angles. The residual index error is checked each time the sextant is used and before an observation is taken.
Finding the value of residual index error. Once the first three adjustments are made, the residual error is obtained by;
- Horizon observation (during the day).
- Star observation (at twilight).
Finding the error using the horizon method.
With the telescope shipped, swing the shades away from the mirrors and set the sextant exactly to zero. Hold the sextant in the vertical position and look through the telescope and horizon mirror at the horizon. If the true and reflected horizons are in a continuous straight line there is no index error. If the true and reflected horizons are not in a straight line, adjust the micrometer drum until they appear in a straight line. The micrometer reading will be the value of index error. If the reading is “on the arc” it is subtracted from the sextant angles. Readings “off the arc” are added to the sextant angles. The reading obtained before adjustment is known as the Sextant Altitude or Angle. The reading obtained after adjustment is known as the Observed Altitude or Angle.
Examples of sextant reading adjustment (residual index error).
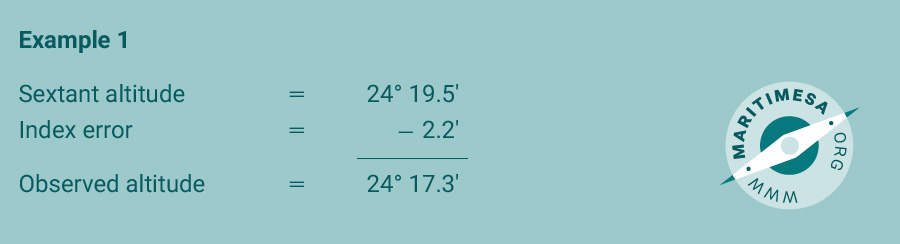
Example 1.
Before taking a sextant altitude of the sun the sextant was checked and found to have an index error of 2.2’ on the arc. After taking the sun sight the sextant altitude recorded was 24° 19.5’. Determine the observed altitude of the sun.
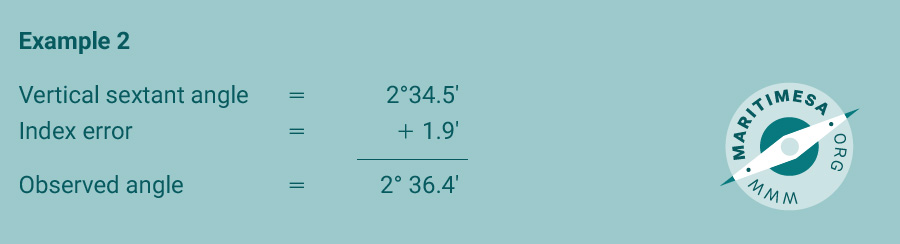
Example 2.
The sextant’s index error was found to be 1.9’ off the arc whilst the vertical sextant angle of an object ashore was 2° 34.5’. Find the vertical angle corrected for index error.
Finding the index error using the star method.
With the telescope shipped, swing the shades away from the mirrors and set the sextant exactly to zero. Hold the sextant in the vertical position and look through the telescope and horizon mirror at a 2nd magnitude star. If the true and reflected images coincide exactly or exactly side by side, then there is no index error. If the one image lies higher or lower than the other, then index error is present. Turn the micrometer drum until the two images coincide or lie exactly side by side. The reading on the micrometer is the index error. As before, readings “on the arc” are subtracted from the sextant angles. Readings “off the arc” are added to the sextant angles.
Principle of the sextant.
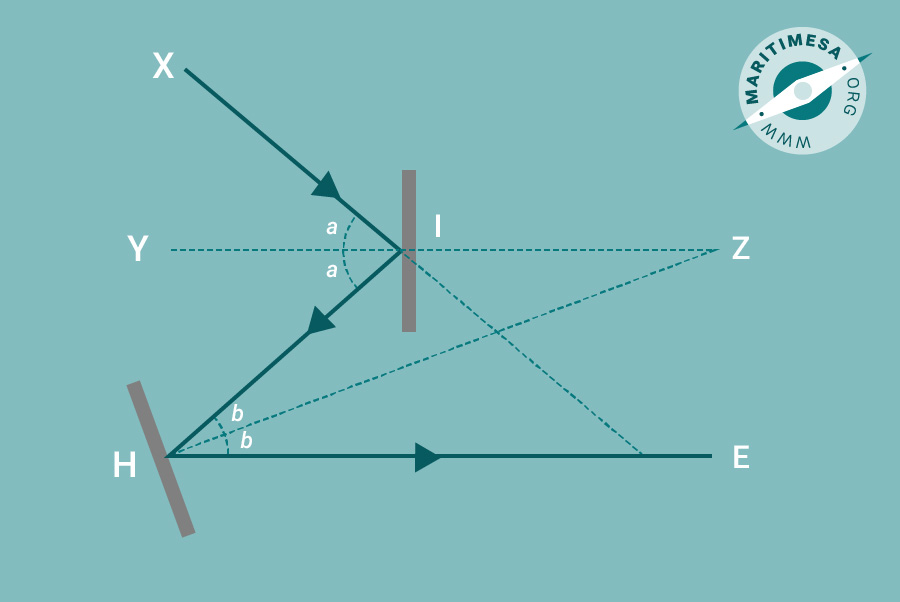
The angle between the first and last direction of the ray is twice the angle between the mirrors.
Legend:
- I = Index mirror.
- H = Horizon mirror.
- XI = Original incoming ray.
- IH = First reflected ray passing from the index mirror to the horizon mirror.
- HE = Second reflected ray passing through the telescope to the observer’s eye.
- IY = Normal to the index mirror.
- HZ = Normal to the horizon mirror.
- Z = Position at which the normals meet.
- J = Position at which lines parallel to the two mirrors intersect, ie the angle of inclination of the two mirrors (not shown on the sketch).
- XIE = Original ray produced to meet the second reflected ray at E.
- LYZH = The angle of inclination between the two mirrors.