Splicing is the preferred means of joining two ropes together. In contrast to knots, splicing only reduces the strength of a rope by 1/8th. There are over 234 different types of splices, but as long as the splice is strong and does not draw out under stress, it will serve its purpose.
Preparation is half the job. If the splice is prepared correctly thin the splice will in all probability be correct. Before starting, a whipping should be put around the rope where the splice will be. The rope may then be unlaid and a whipping put around each strand.
After finishing the splice, with a minimum of 3 tucks, the ends should be trimmed off at a length equal to the ropes diameter or around 3 cm. The reason for this is that when strain comes onto the splice, it will draw, but the strands will not pull out. The strands should be trimmed to lie parallel to the rope.
To really neatly finish off the splice and to show that you take some pride in your work, you can taper the splice off. This is done by taking half the strands and making a fourth or more tuck.
When making an eye splice, with or without a thimble in it, always pull the loose end hard up against the standing part. This will ensure a good, strong splice as well as being good looking. If a thimble is being fitted, if it is not pulled tight, the thimble will probably fall out.
When making a hard eye with a large diameter rope, it helps to seize the rope and the thimble together so that they do not spring apart. The same is done when working with wire.

Thimble and eye splice.
The purpose of a back splice is to finish off a rope which is not required to be rove through a block. It prevents it from unlaying.

Back splice.
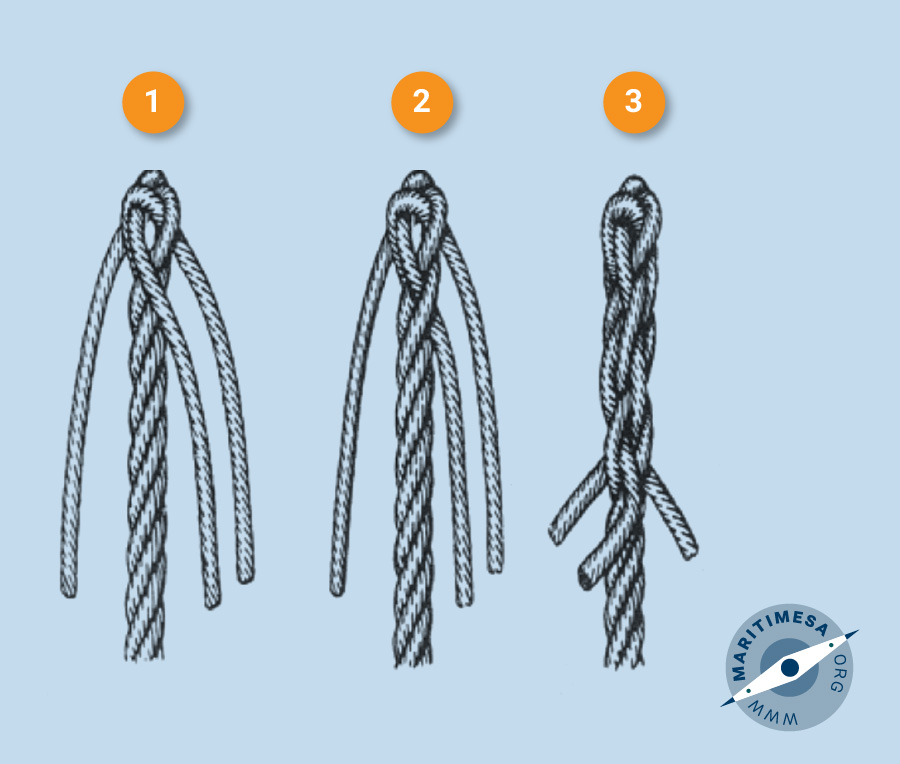
Refer to the above sketch whilst carrying out the following instructions. Whip the rope at a distance from its end equal to five times the circumference of the rope, then unlay the strands to the whipping and whip the end of each strand. Make a crown knot (see (i) of sketch), cut the whipping and then tuck each strand over one strand and under the next, to the left and against the lay of the rope (see (ii) of sketch). After each strand is tucked, pull the strands taut and tidy up the first tuck until each strand is uniform. Repeat the tucking twice more (see (iii) of sketch). Always tuck to the left, using the next strand to the left.
Eye splice. The purpose of an eye splice is to make a permanent eye in a rope.

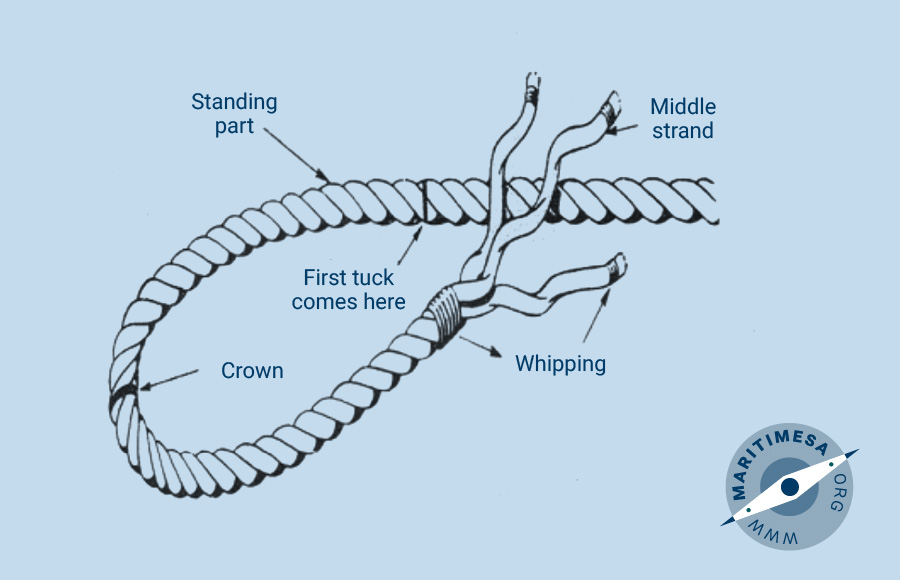
Basic elements of an eye splice.

Eye splice procedure.
Refer to the above figure whilst carrying out the following instructions. It will be noted that the strands are marked as indicated, ie A is the middle strand, B the left hand strand and C the right hand strand.
- Tuck A from right to left, under the nearest strand of the standing part.
- Tuck strand B, from right to left, under the next strand of the standing part.
- Turn the rope right over so as to bring the remaining strand C on the top and then tuck C from right to left under the unoccupied strand of the standing part. Care must be taken to retain the lay of the rope in the last strand tucked as this enables it to lie closer.
- Beginning with C, heave each strand taut. Then tuck all three strands a second and third time.
- Finish off by dogging the ends by halving each of the three strands and whipping each half to its neighbour over the adjacent strand of the main rope as shown in the following figure.

Finished eye splice.
Short splice. The purpose of the short splice is to join two ropes.

Procedure for short splice.
Note the lettering of the ropes and strands in the above sketch, ie A and B are the ends of the two ropes, while C, D and E and F, G and H indicate the unlayed strands of each rope. The strands of each rope are tucked between the strands of the other rope against the lay, each strand being taken over the strand on its left, then under the next strand and emerging between this and the next strand. Some of the whippings and stops have been omitted to show the tucking of the strands more clearly.
- Whip each rope at a distance from its end equal to five times the size of the rope (this whipping has been omitted from rope A in the sketch).
- Unlay the strands to the whipping and whip their ends (these whippings have also been omitted).
- Bring the two ropes together so that one strand of each lies between the two strands of the other (see sketch (i)).
- Ensure that the two ropes are firmly together, then whip the strands strongly round the join to prevent them from slipping. Stop ends C, D and E to rope B with a strong stop. (Whippings and stops have been omitted in the sketch).
- Cut the whipping on A.
- Take F over C, under E and bring it out between E and D (sketch (ii)).
- Take G over E, under D and bring it out between D and C (sketch (ii) & (iii)).
- Take H over D, under C and bring it out between C and E (sketch (iii)).
- Stop G, F and H to A, cut the stop and whipping on B and tuck C, D and E in a similar manner.
- Pull all six strands taut.
- Again tuck each strand on its left and under the next one and repeat the operation a third time.


